So, you’ve purchased one of our card templates – YOU ROCK!
Now, the next step is printing. This article will help walk you through using our provided print template (link in the PDF that had your template link) to print your cards at home.
No printer or not a fan of printing at home? No problem – we’ve got you!
If you’re considering a professional printer, I recommend Prints of Love. My shop has partnered with them to offer fast, high-quality yet affordable printing. Plus free 2-3 day U.S. shipping and free envelopes!
Prints of Love strives to be environmentally responsible and provides eco-friendly printing services. For every order placed, a tree will be planted in your name. How cool is that?
TIP: If using a professional printing service, be sure to download your finished design from Canva as PDF Print for the highest resolution.
OK, let’s get back to printing …
Download Your Edited Design From Canva
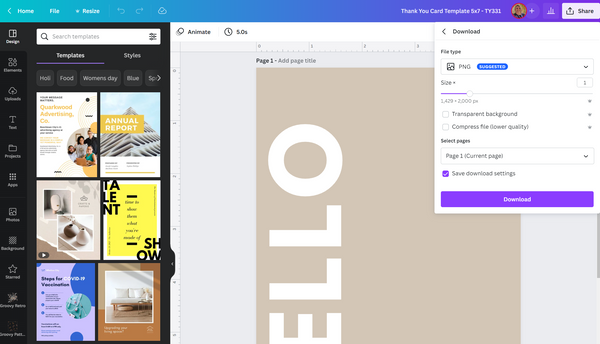
Once you are finished editing your card template in Canva, download it as a PNG file.
To download, select the SHARE button in the upper right toolbar, then choose DOWNLOAD. Next, select PNG file type and if more than one page, only select a single page at a time to download. Then DOWNLOAD the file.
REMINDER: If more than 1 page is downloaded at a time (e.g. front and back), the files will be in a zipped folder. You will need to unzip the folder in order to use the PNG images.

Open the Print Template
As part of your purchase, a PDF file is provided which contains the link to your card template in Canva. On the first page of the PDF, you will also find the link to a print template. Click on the "Print Template" link to open the print template in Canva.

Add Your Design To the Template
Start by selecting the “Uploads” tab in Canva. Next, you can choose to drag and drop your finished design PNG into the designated section, or select “Upload Media” and locate your PNG, then select to upload. If your design is double-sided, be sure to upload both the front and back PNGs. You will now see the thumbnail(s) of your design in the Uploads section.
Drag & drop the “front” PNG thumbnail on top of a box in the template. It will “snap” into place inside the box. If it doesn’t immediately snap in, you may have to move it a bit to get it into place. Repeat this until all boxes are filled.
Next, download this completed print page as PDF Print.
If your design is double-sided, repeat the steps above (drag and drop the “back” PNG into each of the boxes). Then, download the back print page as PDF print.
You now have two letter-sized print pages, one for the front and one for the back of your card.

Printing
Print the “front” PDF page to your chosen paper. If a double-sided design, flip the paper and reinsert it into your printer. Now print the “back” PDF page. You may have to test out how to flip/rotate using your printer to get it correctly orientated.
I recommend using white cardstock paper which you can purchase from a variety of sources (Amazon, Staples, OfficeMax/OfficeDepot, or another craft store). Anything between 80 – 110 lbs cardstock paper is recommended (depending on your printer). For reference, business cards are 110 lbs. Some printers cannot handle thicker paper, so be sure to check your printer documentation first.
TIP: One very important thing to note – most home printers do not actually print white ink or toner. This is even more important if your design incorporates white lettering or graphics. You will need to adjust the color to something darker and test it against your colored paper to see how it will look.
Finally, you can trim out your cards and add them to your packaging!


